Showing posts with label Silver. Show all posts

December 28, 2014

Sneaky Sneek-e

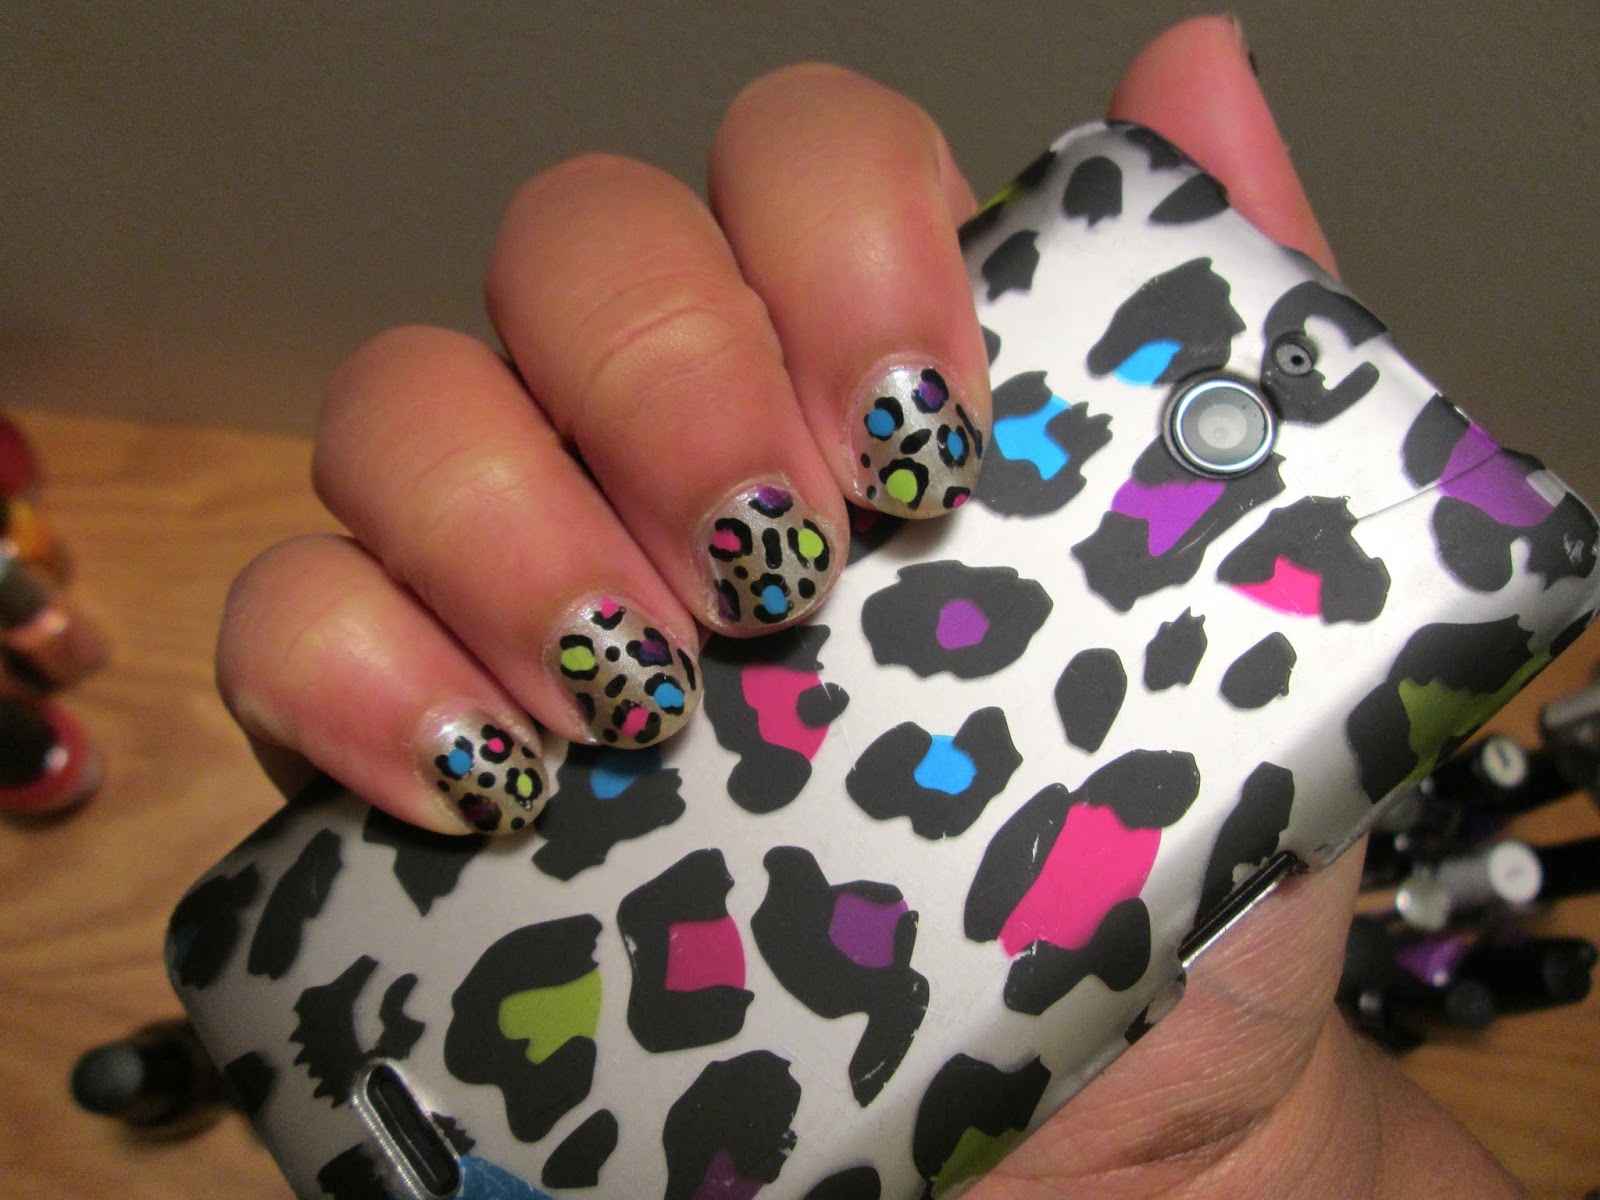
Essie Sleek Stick Applique in Sneek-e
I'm always looking for ways to save time on a manicure, so when I found these Sleek Stick Appliques at my local Dollar Tree, I picked up a couple of sets to test them out. I was shocked to see them on sale for $1, seeing as they retail everywhere else for $9.99, but I love a good bargain!
They come in a pack of 18, so it's pretty easy to find a size match for every nail. It also includes a rough emery board-like file. 
The directions say to peel the sticker from its backing, smooth onto the nail, and file the excess from the tip. It was easy enough. But it was pretty difficult to peel the thin sticker from the plastic sheet. I found it better to use my tweezers instead of my fingers.
Once on the nail, the stickers were easy to stretch and smooth out. I was careful not to get the sticker on my cuticle, because it was tough to file down the excess once it was stuck. 
I experienced some wrinkling around my tips, due to my rounded nails, but it was minimal. Once I got the hang of filing down the edges, the wrinkling decreased. I was scared of peeling, so I wrapped my tips with Seche Vite. I didn't want to put top coat over the whole nail, because I was afraid of warping the sticker.
Even though I sealed my edges, the peeling with these appliques was gnarly! They barely lasted 3 days! I was so disappointed, but it could have been worse...
My tip is to put a base coat of nail polish under the sticker, for both aesthetic and practical purposes; the top coat will likely seal the tips better, and if the sticker does peel, you won't be left will a bare nail.
So here's the final verdict: I love the designs of the stickers, and if I can find them again at Dollar Tree, I'll purchase more. They are not worth $9.99 at all. They would be great for a night out or special occasion, but are not built for long-lasting wear.


Bright and Sparkly V-Gaps

China Glaze Nude and Icicle, Essie Devil's Advocate, Color Club Technicolor Doll

The v-gap style has become a favorite of mine, mainly because it's easy, and I can hide imperfections easily with a cute little border along the edges. It helps to have a striper brush to do this, but with a steady hand, I think it can be done with the polish brush. Here's what I do: I make a small line in the middle of my nail, from where the tip of the "V" is, to the tip of the nail. I then connect that small line to points halfway up my nail on either side. Fill in the section, and you're done! Don't forget to wrap the tips!
Plum, silver and pink is a winning combination in my book, and this mani is proof why.


Baby's Second Zebra Print

Sinful Colors Orange Cream, China Glaze Icicle, Kiss Striper Soft Blue
I don't know if I quite fulfilled my promise to do a zebra design with "all sorts of crazy colors," but I think I did an okay job!
I can't believe I've waited this long to try out a zebra print design, but I'm glad I did at all. It was super simple with a striper brush. All I had to do was begin the line from one side of my nail, then flick the brush toward the middle of my nail. Do this from both sides, and a couple of double stripes, and boom! Done.
This was also a good chance to practice my gradients, as they still need a bit of work. This is not a normal color combo for me, especially since the orange color made the silver glitter appear gold. But I'm not mad about it. It ended up warming and softening the mani!


Chip Off the Old Color Block

China Glaze That's Shore Bright and Tinsel Town, Sally Hansen Sun Kissed
I needed a change. My go-to color combo of blue, pink, and maybe another color was dragging me down. So I decided to use orange, which I rarely pull out of my stash, especially along with purple! I just went for a simple color block using masking tape to create a two-tone mani.
It looked good that way, but I needed a bit of sparkle. So I opted for a gritty silver from China Glaze. I freehanded the silver bits, and finished off with a thick coat of Seche Vite.
The result is an eye-catching, color blocked mani that pushed me out of my comfort zone. I even got compliments from a potential employer during a Skype interview!


January 4, 2014

Just Plain Sophisticated

Essie Devil's Advocate, China Glaze Too Yacht to Handle, and China Glaze Icicle

As you all know, I'm such a fan of manicures that look like they took forever, but they really didn't. That's exactly what this is! If you have a couple colors of polish, some Scotch tape lying around, and a dotting tool (or make your own, if you don't have one), you can recreate your own version of this manicure within a half hour.
Instead of using a nude polish as a base, as I did in this tape mani, I just put on a couple layers of base coat (I use OPI Matte Nail Envy), and let it dry completely before proceeding. Granted, this might not be the best option if you have staining from a previous manicure. If you do have staining, I would suggest buffing your clean dry nails just a little bit to see if you can buff away the surface stains. Too much buffing will weaken your nails, and if the stains do not readily come out, just swipe on a thin coat of a nude polish (for this look), or your favorite creme.
Once the base coat dried, I taped off the bottom half of my nails on a diagonal, and painted Devil's Advocate on my tips, enough for opacity. I recommend putting the tape on your hand before putting it on the nails, because Scotch tape will readily rip up your base coat! I loved the look with the plain plum tips, but I tested out the dots on my left hand, and loved it even more! The dots can also function to help cover up a crooked tape line, or other tiny mistakes. It's a win-win! I finished with a coat of Seche Vite, and boom! Done!
I hope you enjoy these nails! For more manicures that don't make my main blog, in addition to mani updates right after I complete them, follow me on Instagram @donithax!


September 9, 2013

Been There, Done That


Base: Icing Champagne Bubbles
Colors used: L.A. Colors Circuits, Revlon Empower, Sally Hansen Xtreme Wear in Purple Potion, Green with Envy and Blue Me Away!


I have done this simple nail art many times before, on my own nails, and on those of friends. It never gets old, in my opinion. I wish I had "before" pictures, so I could properly show how much I've grown since first getting into nail art.

But to review: I painted two coats of my base color. Next, I made C-shapes and almost-closed circles with a bobby pin and a dark color (This time it was a black, LA Colors' Circuits). After cleaning my bobby pin acetone, I used it to fill in the Cs and circles with bright colors. Afterward, to fill in gaps, I used the black color to make small dots and lines all over the nail.

I only had a few minutes before I had to dart off for choir rehearsal today, and this was something I knew how to do. The "inspiration" for me recreating the design came from my phone! (The case, to be specific). It looks like this:


It's kinda cool having my nails match my phone. I've gotten some positive feedback, so for future projects, I'm going to draw inspiration from other sources close to me. (Maybe outfit inspirations? Hmmm...)


July 15, 2013

Split Splat!

China Glaze Icicle,  Color Club Bright Pink, Sally Hansen Lightening, and Love & Beauty Lavender


I finally tried out splatter nails! I didn't have a straw or coffee stirrer on hand, so I used the end of a clicky pen, and that worked just fine. Cleanup was hellish, but I honestly think it was worth it. I'm such a fan of the technique.


June 12, 2013

Old Faithful(s)

Nails, Inc. Haymarket, Revlon Empower, and China Glaze Tinsel Town
Hi, everyone! I'm back at home in Atlanta for a few days before I head back up to Maine for the summer. I can only bring a few polishes in my carry-on, so I stick with my favorites (the polishes with which I know I can create something without stressing myself out). So I know you've all seen these colors before, but I really wanted to try out this Chalkboard Nails design for Nails by Kayla Shevonne. Even though I couldn't find any tape, I thought I'd just go for it. (I just went back over the lines with Haymarket at the bottom). I really needed to paint my nails because they'd been bare for a little over two weeks! 
I have also been waiting that long to try Out the Door Topcoat. My impression: it definitely dries fast, with great shine, but it's a little thin. Shown are two coats. My nails are still fairly bumpy/gritty (due in no small part to the glitter of Tinsel Town), and I'll likely need another coat or two to smooth things out. I just can't stop thinking of my trusty Seche Vite that smoothed everything over in 1-2 coats...


All in all, this color combo is a favorite of mine, and I'm pleased with what I've done, especially considering that these photos include no cleanup! I ran out of nail polish remover, so I made sure to be careful when painting. It's comforting to know that I can actually paint my nails properly. I've been using that pure acetone as a crutch!


May 21, 2013

Summer is Here!

Wet 'N Wild Candy-licious and Sinful Colors Pinky Glitter with Nails, Inc. Haymarket and China Glaze Tinsel Town
Hey everyone! There isn't much of a story behind these nails. I just knew I wanted something bright, bold and glittery! I love these, although I was really tired, and things got sloppy toward the end there...
But I'm not going to sweat it!


They sparkle in the sunshine, though it's been nothing but rain here in Maine... Here are a couple of [unedited] flash photos to simulate the sun rays:


That's it from me! I hope to be updating more frequently, now that school has let out, but we'll see how well that works out once I begin my job...


April 30, 2013

Who Doesn't Love a Dotticure?

China Glaze Flip Flop Fantasy with Wet 'N Wild I Need A Refresh-mint, Nicole by OPI Candid Cameron and China Glaze Icicle
This next week and a half will be full of big assignments as the semester wraps up, and reading period begins. So today, after an Evolution presentation, I decided to treat myself and paint my nails (because who knows when I'll have time to do them again before summer?).


I wasn't feeling particularly creative today; all I knew was that I wanted to use Flip Flop Fantasy because it's so bright and wonderful. I went for my trusty dotting tools, and this is what happened. I like it. Simple, but interesting.

Also, I really like taking pictures of my nails by my window now. The [indirect] natural light does wonders for the color and overall quality of my photos.


March 18, 2013

ASB Nails!


Nicole by OPI's A Phil's Paradise with Revlon Empower and Essie Devil's Advocate
For the first week of my spring break this year, I took a trip with 11 other Bowdoin students to New York City to participate in an Alternative Spring Break (ASB) trip. We volunteered as teaching assistants in an elementary school in the Bronx, and did a week long service project in Harlem. I had such an amazing time, and I made so many new friends. It's hard to put into words just how blessed I feel to have gone to NYC.
I did the nails above on the first night, thinking I'd do something fun and simple (and quick) to reflect my optimism and excitement for the week. I had just bought Empower and Devil's Advocate the day before in a Rite Aid sale, and I really wanted to use them. So I just went for it with my dotting tool, and it ended up as leopard print. Not even mad, though. I got many compliments from my second graders and other kids at the school, so it worked out. :)
  
China Glaze I Herd That with Sinful Colors Snow Me White
 I did these gold nails for my friend Tori on our last night in NYC, after a long day of volunteering and sightseeing. Since St. Patrick's Day was right around the corner, she wanted something eye-catching and sparkly. I forgot my green polish, but I Herd That seemed to do the trick. Add in a mix and match (my fave), and we were good to go!

February 26, 2013

Ebony Ball Nails!

China Glaze Tinsel Town with L.A. Colors Black

Last Saturday (Feb. 23), the African-American Society at Bowdoin hosted the annual Ebony Ball, a semi-formal event celebrating Black History Month. The theme this year was "Harlem Nights," so I went with something super simple and classy.

February 10, 2013

VagMons-Inspired Mix and Match

KleanColor Red Alert with China Glaze Tinsel Town and L.A. Colors  Color Craze in Black

Because I am performing in The Vagina Monologues this weekend, I needed to have a red and black mani to match the occasion. I decided to add some silver for a little "pop," and boy, am I glad I did! I am so in love with this mani! It's so busy, as I sort of went crazy with my dotting tools, but that's just what I need: Something to boost my confidence for this weekend! :)

Have another picture because I can't get enough:


February 6, 2013

Red Leopard Print Half Moons

Essie A-List with Nicole by OPI A Phil's Paradise

I've been dying to try out A Phil's Paradise from the Nicole by OPI Modern Family Collection since I bought it last Saturday! It's a gorgeous pewter glitter, and it blows my mind. It can lean from copper to blindingly silver, depending on the light. Even though the formula was a bit tricky (read: goopy), it is easily one of my favorite polishes.
I also decided that it was finally time to try out a half moon mani with reinforcement stickers, just to compare it to the freehanded ones I did a while ago. They definitely didn't take as long this time, but I had a bit of trouble placing them (either too far left or too far right). The curve of the stickers is too narrow for my thumbs, but that's not a huge issue. I love how they came out!
Here's how they looked originally: 


I've been toying with the idea of a leopard gradient, and I really like this! I'm thinking about bringing them back for next week, when Bowdoin's production of The Vagina Monologues goes on. We have to wear red and black clothes, so why not carry the theme all the way down to my fingertips?


January 28, 2013

Shiny Geometric Print

China Glaze Icicle, Sally Hansen Blue Me Away!, and Sinful Colors Let's Talk
I remember seeing this Dressed Up Nails design a while ago, and I vowed to try it for myself. I really like how it came out! This design didn't take very long, and it was very easy to do! Even if you don't have a striper, you can use a toothpick or the end of a bobby pin. There are also brushes available for cheap online. I bought these on ebay for about 2 dollars!

Poor Swirls

Sally Hansen Blue Me Away!, Destined Pale Yellow, and China Glaze Icicle

I ended up not liking this manicure as much as I thought I would. The swirls did not come out as I hoped, and the silver dots made it look busy, and almost tacky. Not to mention the fact that I broke most of these while I was traveling back to school! Sigh.


ColorBlocking!

China Glaze Tinsel Town, Sally Hansen Blue Me Away!, Destined Pale Yellow, and Wet 'N Wild Through the Grapevine
I LOVE THESE NAILS. They are so bright, and full of energy! Imagine having this on all 10 of your fingers! Whoo!

Loops!


As I am in love with China Glaze's Tinsel Town, I decided to wear it as soon as I got home for winter break. I was going to add more detail/loops, but I liked the Destined Pale Yellow alone.

Secret Snowflake!


On my floor, right before the holidays last year, we had a gift exchange called a Secret Snowflake. I decided to get into the spirit a bit, and work some glitter onto my nails. I LOVE LOVE LOVE these glitters! China Glaze Tinsel Town and Ruby Pumps.


How Fast Can Donisha Paint Her Nails?


These took me all of 15 minutes, and I was quite pleased with them. I needed a new mani for a friend's birthday dinner, and I think these were just festive enough. Wet 'N Wild On A Trip with China Glaze Icicle.


Related Posts Plugin for WordPress, Blogger...